Tuesday, November 17, 2015

Final Turns of General de Brigade tutorial

Turn 7- The French win the initiative and are determined to drive back the Dutch/Belgian right flank.  All three battalions of the 4th Legere attempt to close but must roll a five or six to do so since Jamin has not yet come up with in command range.  Two of the three battalions succeed! The 2nd Orange Nassau issues a very ragged volley and is only able to inflict one casualty.  Both legere battalions pass morale which forced the Orange Nassau unit to test.  They roll a six, but must subtract one for being 2nd line and two more for being in line formation.  The result of three means the blue clad line must retreat half a move immediately.  This means there will not be a melee, which is fortunate for the Orange Nassauers.
4th Legere attacks the 2nd Orange Nassau
The 2/100th lose another three figures but somehow manage to pass the morale test and stand their ground.  To their right, the 3/100th Ligne aligns itself to charge three companies of the 2/2nd Nassau. The village's garrison fire from their hiding places but don't do any damage.
No damage done.
To make things a little more exciting and to touch on some other aspects of the rules, a brigade of cavalry arrives for each side.
The Dutch/Belgian cavalry arrive in line.

The French lancers approach in column.
Turn 8- The 2nd Orange Nassau complete their retreat move and await the pursuit of the 4th Legere.  The 2/2nd Nassau forms line on the right to secure that flank while the 3/2nd goes into column due to the presence of enemy cavalry.
The 2nd Orange Nassau rallies, but is unformed with the French still coming at them.
At the village, the 3/100 charges the village.  A pathetic volley greets them, but is ineffective.  The pass their morale and charge home. The defenders are equally resolved to hold their position, so a melee ensues.  The French roll an 11 and add two for being infantry and two more for charging; a sum of 15.  The Nassauers roll a five and get plus two for being in buildings for a total of 7.  The difference is 8, which means that the Nassauers must rout out of the town on the next compulsory move.
The charge goes in.
The Nassauers lose.
In the movement phase, Gauthier's brigade forms into square as they see the Dutch/Belgian cavalry appear on the ridge before them.  The lancer move up and prepare to charge.

Turn nine- The French win the initiative.  The sun is setting in the west and as darkness draws across the field, Napoleon's legions will try to secure the victory.  The 1/4th Legere boldly crashes into the rye fields in hopes of coming to grips with the 2nd Orange Nassau battalion.  On the other end of the field, the 6th Lancers thunder towards the 2/2nd Nassau battalion.
The lancers charge forth and the Nassauers attempt to form square.  They must roll a 9 or better to succeed.  They roll a 10!
In the movement phase, the 3/100th Ligne occupies the portion of the village that it secured.  They must roll a formation test to see if they end up formed, but they fail, and are unformed.  Regardless, they have attained a foothold in the center of the enemy line.
A foothold in the town!
During the movement phase, the Dutch/Belgian cavalry form into columns.  This formation will be much more suitable if they are to navigate the checkered battlefield.

And so it all comes down to the final two melees of the game.  On the French left, the 1/4th Legere plunges into the rye field in an attempt to finally put the 2nd Orange Nassau to flight.  In desperation, the 2nd Orange Nassau fires a volley.  They roll a double six!  The stunned veteran Frenchmen falter and cannot go any further.  Brigadier must once again roll to see if he is hit and a seven comes up.  He is lightly wounded for the second time.  The attack on the French left has been repulsed.
For the third time in the game!
Jamin is wounded yet again.
And so, it will all come down to a cavalry charge.  The lancers close with the men in dusty green uniforms and roll a 4.  They add three for being lancers, two for charging, and two more for being lancers against infantry: 11.  The Nassauers roll an 8.  They add two more for being infantry and then an additional four for being in square: 14; a difference of three.  The lancers are defeated and must retreat.  The Nassauers, despite having their numbers halved for being infantry versus cavalry, still take out three of the cavalrymen, and entire stand.  The losing cavalry cause one casualty for every 8 figures.  There are 24 in the unit, so three Nassauers are lost.  But the square has held and the last ditch efforts of Foy have come up short.
Squares are very hard to beat in these rules.
So I am going to call the game as a minor victory for the Perponcher's Dutch/Belgians.  It was a close call for them.  Their lucky dice rolling was the major difference.  Three double sixes put the French back on their heels.  And a lucky roll of 10 to form square more than likely saved the Nassauers from destruction.  But that's what makes this game so much fun.  You never know what will happen next.


50,000 Visits!

I have had over 50,000 visits to my blog.  That's quite a milestone and I appreciate all of you who have taken the time to check out my posts.  I hope to keep going strong for several years to come.
Happy gaming to you all.

Sunday, November 15, 2015

General de Brigade tutorial part 3

Turn five saw the Perponcher winning the initiative yet again.  Gaauthier's brigade was moved back 30cm during the compulsory move phase.  During the orders phase, Gauthier was replaced with an ADC who hopes to reorganize the brigade and get back into the fight.
The retired brigade in its new position

Foy's ADC arrives to try to straighten things out.
On the French left, the skirmish screen attempts to drive in the Dutch/Belgian screen.  They suffer two casualties on the way in, but roll well for morale and are able to close.  The Dutch/Belgians pass their morale check as well, so there will be a melee.  It turns out to be a draw.  Each side is unformed and loses a figure.  The melee will continue in turn six.
The skirmish battle.
During the fire phase the Dutch artillery inflicts another casualty on the retired French brigade.  But to the right of the battery the 1/Orange Nassau battalion unleashes its first volley of the game with deadly effect; a double six is rolled.
 A horrific volley!
The 2/100 loses six figures, is faltered and will have to take a morale check at the end of the turn.
the 2/100th has lost a stand and been marked as faltered.
The nearby brigadier now must test as well.  He rolls a six...
The risk to general chart
He is lightly wounded and immediately moved back 20cm.  He will be out of action for turn 6.

Turn six: The French won the initiative for this turn, and it would prove helpful.
There were no compulsory moves this turn, so it was time to see if the newly arrived ADC could get Gauthier's brigade back in the fight.  Since the brigade had been broken it received a minus 1 to its roll.  But the dice added up to nine, less the one equaled 8, which was enough to give the brigade an assault order.

Jamin's men did their best to continue the fight while their general's light wounds were attended to.  The 3/100th, in position on the Dutch battery's flank, need to roll a five or six to be able to charge since they were out of command range.  A five was tossed, so the charge was on!  Additionally, the two skirmish screens would be fighting out their melee for a second turn.

In the fire phase, the French were quite unlucky, inflicting no hits.  The Dutch/Belgians, however, were quite the opposite.  Their battery, with no chance to realign the guns to defend against Jamin's infantry, decided to unleash one last salvo at Foy's limbered guns.  A double six was rolled, doubling the number of hits to four and forcing the battery to pull back 20cm faltered.
The Dutch battery did terrible execution to the French limbered battery.
Elsewhere along the line, the Orange Nassau battalions did more damage to their French counterparts, despite the -2 for having fired the previous turn.
The 2/100th Ligne loses another stand and is faltered and does no damage to the 1st Orange Nassau

The legere battalions continue to move through the woods.  It's taking a long time to get these veterans into the fight!
In the melee phase, the Dutch/Belgian skirmishers were just able to eke out a victory over the French light infantry men.  On the other side of the field, the 3/100th lowered their bayonets and charged the flank of the Dutch battery.  The helpless gunners had to take a morale test.  They rolled a nine, but had to deduct -2 for being artillery and -4 for being charged in the flank.  The result was the artillerists had to flee their guns and retreat 20cms.  The 3/100th carried the position, but now their flank was exposed to whatever reserves Perponcher might have lurking in the hamlet.


Wednesday, November 11, 2015

Accepting commissions for painting wargaming figures

The fact is, I enjoy painting wargaming figures and I think I have gotten to be pretty good at it. In throwing my hat into the painter-for-hire ring, I believe I have two very desirable qualities: I am very reasonably priced and I can paint a large number of figures rather quickly.

There are many, many examples of my workmanship on this blog that will give interested parties an good idea of my ability.  For 15mm figures, my price is $1.25 per infantry figure and $2.50 per cavalry figure.  I am also willing to negotiate discounts for larger commissions of 100 or more figures.  Prices for 28mm are $2.00 per infantry figure and $4.00 per cavalry figure.  I can base your figures to your specifications for a very reasonable fee.  Again, my blog has scores of examples of my style.

Interested parties may contact me at dukewin@ix.netcom.com. I'd love to have the opportunity to turn your lead into gold.

28mm Victrix Highalnders
28mm Victrix British Artillery
15mm Old Glory figures

In Remebrance

I want to acknowledge my deep gratitude to all of those who have served in the military. Thank you for your many sacrifices and for the many blessings you have provided for others.

Monday, November 9, 2015

General de Brigade Tutorial Part Two

I was able to play out two more turns after work today.  Several interesting results occurred that I am glad to be able to illustrate.

Turn three- The D/B won the initiative by rolling a 12 to beat the French modified roll of 11.  This was an omen of what was to come.  Again, there were no compulsory moves or order changes, but this time the French attempted to charge their skirmishers against the enemy's skirmish line.
The French attempt to charge the enemy skirmish line.
The French skirmishers were moved half way towards the enemy.  There they awaited the fire phase.

The French then moved the rest of their units into position to be able to charge the next turn.
Gauthier's men advance.
The legere battalions continue to move forward.

Some of Jamin's men move into line to diminish the affects of the enemy guns.
Next came the fire phase and here is where things got very interesting.  The D/B artillery fired first and rolled double sixes.  This is a very important part of the game.  In this case, the French enemy suffered six casualties, but even more significantly, General Gauthier had to take a risk to general test.  He rolled a three, so his horse bolted off into the enemy lines and he was captured!
Double sixes. Very exciting!
The chart that indicates the results.

Gauthier's terrible luck
Elsewhere, the French skirmishers met with varied results.  The legere screen was faltered (a morale roll of 4), but the line lights passed their morale check.  This meant that the D/B screen needed to take a morale check.  They rolled poorly and suffered a result of "retreat."
The morale chart.

The French morale roll.

The Dutch roll poorly and must retreat during the next compulsory movement phase.
Turn four- I must admit that before I begin I forgot a couple of details.  First, Gauthier's brigade should have taken a brigade morale test at the end of turn three.  I decided to do it at the end of turn 4. Secondly, without a brigade commander, the charge I conducted in turn four should not have been allowed, but I got excited and plunged three French columns into an assault.  But the opportunity to go through the mechanics was important. so here we go.

The Dutch/Belgians won the initiative yet again.  During the compulsory move phase the D/B skirmishers moved back their 20cm.  In the charge phase, the three battalions of the 93rd Ligne moved half way towards the 3/2nd Nassau and waited there for the fire phase of the turn.
The 93rd attacks!
During the movement phase, the 92nd Ligne moved a half turn towards the Dutch battery.  The Dutch guns were not as effective this turn, inflicting only one casualty.  The French musketry wasn't much better, also inflicting only one casualty.

Now to the melee.  The 3/2nd Nassau unleashed a volley.  With 37 figures and the modifier of shooting at a massed column, five hits were distributed among the three battalions.  Each battalion rolled for moral.  The 2/93 rolled a seven, but had to subtract two for casualties and one for being 2nd line.  This battalion faltered.  The 1/93 in the center rolled a nine and also suffered a minus three.  But a six was what was needed to pass, and so they did.  The 3/93 rolled a 3 and had to subtract 2, resulting in a modified roll of one.  This unit was forced to retreat.  The 1/93rd would be going in alone.  The Frenchmen rolled a five.  They added two for charging and one more for being in column. The net total was 8.  The 2/3rd Nassau rolled and 8 and were able to add 2 for outnumbering the enemy by 2 to 1, a net of 10.  The 2/3rd won by two which means the 1/93rd was pushed back.  More importantly though, winning infantry inflicts one casualty for every six figures.  At 37 strong, the French lost 6 while only taking out one of the Nassauers.
Morale results from the Nassau fire.
The 1/93rd is repulsed with great loss.
The last phase of each turn is morale checks.  In this case, the D/B skirmishers had to see if they could shake off their retreat marker.  They rolled high and were successful.  And then it was time to check the morale of Gauthier's brigade as losing their commanding officer mandated one.  All of the units in the brigade were 2nd line which is a minus one modifier.  A six was rolled, knocked down to a five: the brigade breaks and must retire 30cm on the next compulsory move phase.  This is a staggering blow to Foy's offensive.
So close, yet so far.  The brigade fails morale by one.
It will be up to Jamin's men to achieve the victory on the French left.  We'll see how that goes in the next post.

Sunday, November 8, 2015

General de Brigade Tutorial Part One

I have really enjoyed playing the General de Brigade rules.  The after action reports I have read have helped me understand the finer points, as did the sample battle in the rule book.  I thought I would add my own tutorial for anyone interested in getting a better grip on how the rules work.  My intent is to go step by step in each turn and have photos of what actually happened so that there is a clear mental picture of how things work.

The set up- Of course, there needs to be a scenario for the battle.  In this case, I am trying to recreate the opening moves the eventually led up to the Battle of Waterloo.  A French division under General Foy has advanced across the frontier and is attempting to capture a small but vital hamlet.  The Dutch/Belgian brigade of Prince Bernhard of Saxe-Weimar from the division of Lt. General Perponcher is defending the hamlet.

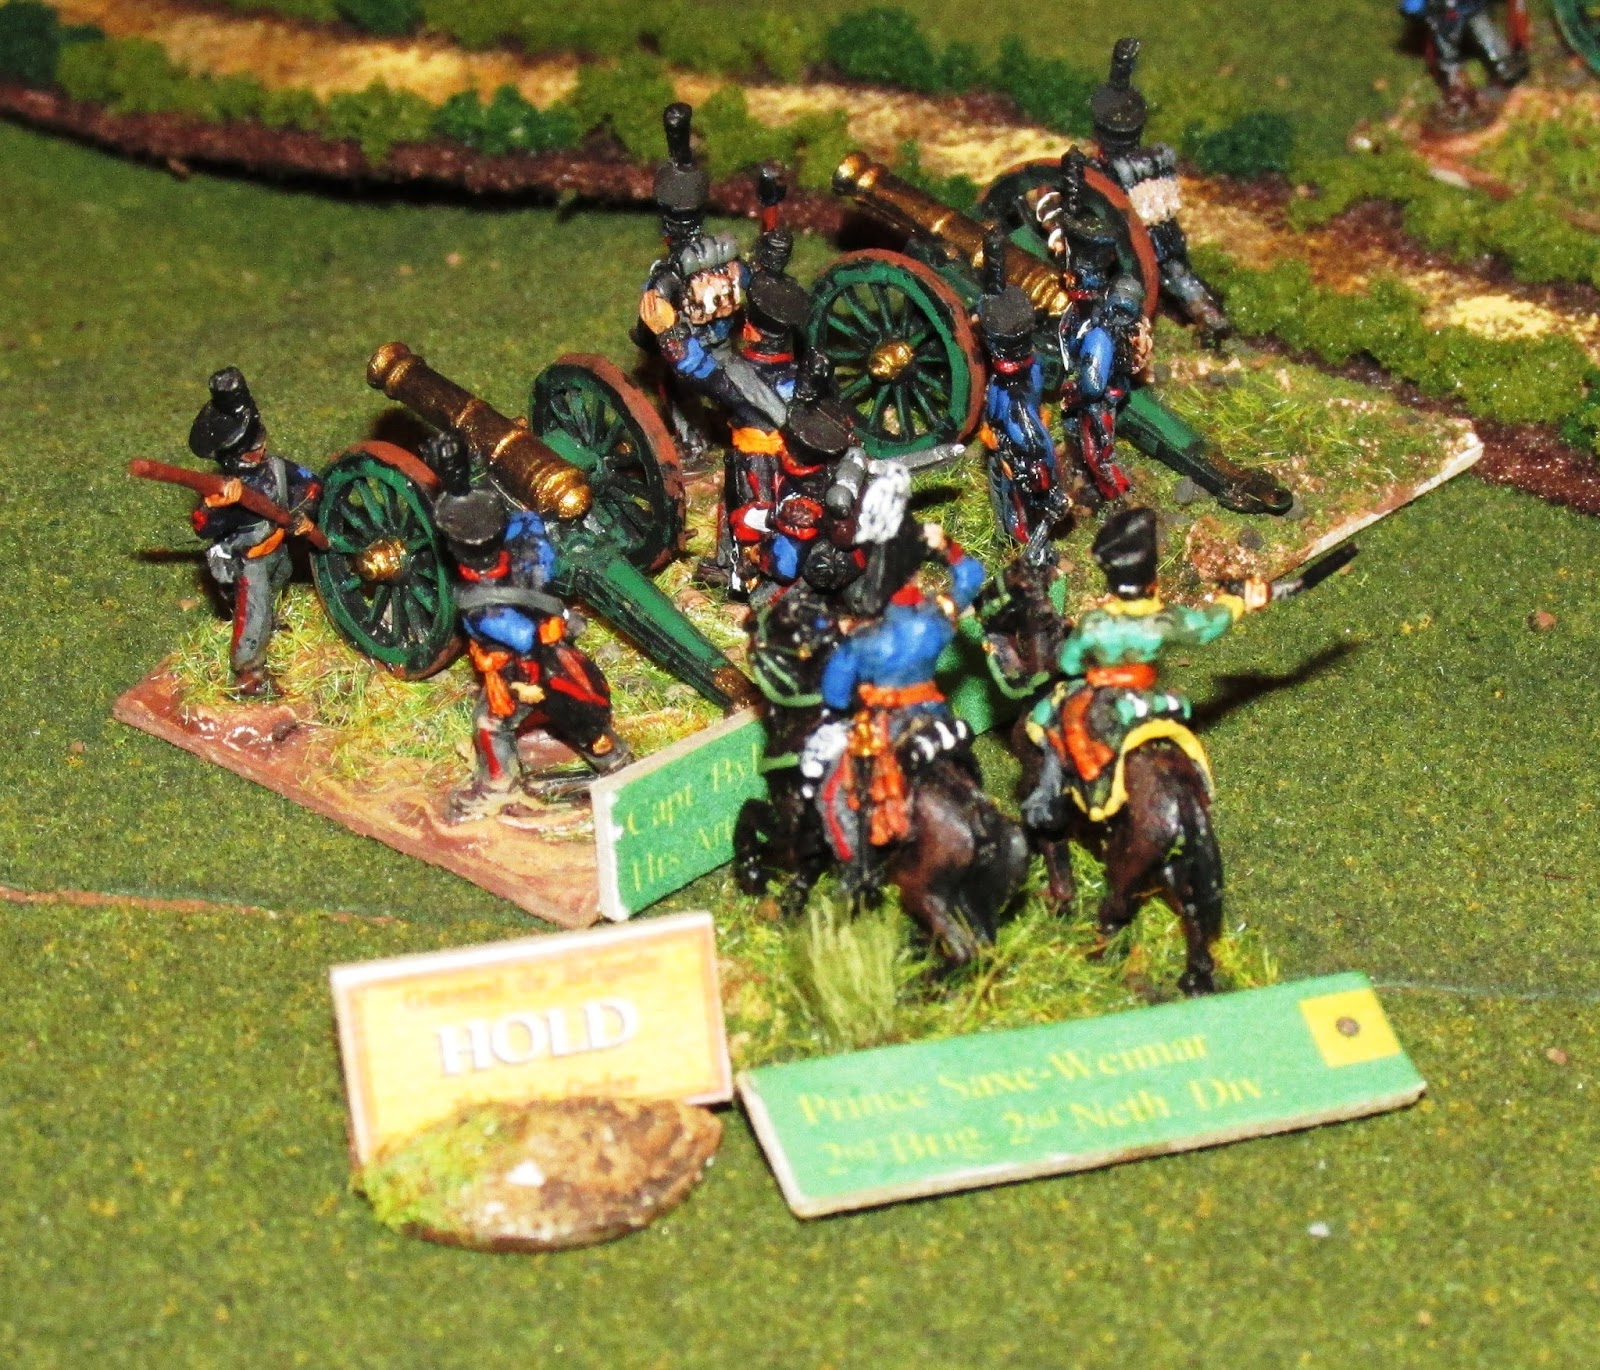
The first step in starting the game is issuing orders.  In this case, General Perponcher has chosen to defend the hamlet and has given Prince Bernhard a "hold" order.

It's a bit blurred, but this is Perponcher's stand with a "Defend" order next to it.
Prince Bernhard is up with his artillery and has the "hold" order next to him.
General Foy is eager to push the Dutch/Belgians aside, so he has given his division an "Attack" order. He has instructed both of his brigades to "assault."  This is the most aggressive order that can be given.
General Foy and his "attack" order.
General Jamin commands the brigade on the French right and will be attacking across relatively open ground.

General Gauthier is on the left and has a forest to negotiate before he can get at the enemy.
The game is now ready to begin.  The first step is to determine initiative.  Both sides roll two D6.  The French get to add one to their total.  The higher number decides who gets the initiative.  The winner can choose to go either first or second.
General Perponcher rolls a seven.

General Foy rolls a ten and adds one.  His 11 beats the 7, so he can choose to go first or second.  He wants to go first.
The next step of the turn is compulsory moves, but there aren't any at this stage, so we move to the next phase which is orders.  Both sides have already issued orders and neither wants to try to change any, so we move on to charges.  No units are close enough to charge; this phase is skipped and now it is time for movement.  Foy, having won the initiative, gets to move first.
Jamin's men are in column and skirmish order, so they can move 15cm.
Here the units have all been moved.  There are five elements in this brigade, the four battalions in column and the skirmish screen.
Gauthier's men are also set to move, but in his case, his left-hand regiment, the 4th Legere, has to move through a wood.  It's movement is halved.
The legere battalions will move at half speed through the wood.
The Dutch/Belgians choose not to move this turn.

Now comes the firing.  Foy gets to fire first.  He begins with his artillery which shoots at the Dutch horse artillery.
The French roll
Foy rolls a four.  This is modified with a -2 since the Dutch guns are deployed.  In consulting the fire results table for a total of two for four guns, we see that there are no hits.  But now the skirmishers can take a shot.  Six of them are in range and therefore get to throw two dice.
A six and a one.  The skirmishers hit the battery one time.

The Dutch battery has been issued a marker showing that it has been hit one time.
The rest of the French skirmishers are either out of range (not within 20cm) or miss.
Now it's the Dutch turn to fire.  Perponcher directs his battery to fire at one of the advancing columns. It is not yet in cannister range, but it is still in close range.  The battery gets to add one to its roll since the target is in column.  A nine is rolled, plus one equals 10.  The chart is consulted and a 10 from 4 guns equals 2 hits.
The Dutch guns fire.

The French column is marked with two hits.
The firing is concluded.  There are no melees to resolve and no morale checks to be taken, so the first turn is over.
Turn two-
Both sides roll for initiative.  Foy rolls a total of six and adds one for being French.  Perponcher rolls an eight and thereby wins initiative.  He elects to go first.  There are no compulsory moves and neither side wants to attempt to change any orders.  Both sides are still out of charge range, so it's time for movement.  Perponcher's only move is to pull back a small unit of jagers on his extreme right flank.  Foy, on the other hand, advances all of his units the maximum distance.
The French legere continue to move through the woods.

The other French brigade advance quickly across the open ground.

Dutch jagers to be moved back.
 It is now the fire phase.  The Dutch/Belgians get to fire first.  They start with the artillery and shoot at the advancing columns.  They are not allowed to split their fire, and so all four guns fire at once and the casualties are distributed as evenly as possible between the two targets which are in cannister range.  A seven is rolled.  It is modified with a plus 4 for firing cannister and a plus 1 for firing at a column.  The total of 12 for four guns equals three hits.  The skirmish screen takes the first hit and the column behind it takes the second.  The other column loses one of its skirmisher figures.
The hits are recorded on the advancing French column. The first casualty is applied to the skirmish screen.
The Dutch skirmishers fire, but don't get any hits.
It is now the French turn to fire.  The medium battery again targets the Dutch guns.  Snake eyes are rolled, which means the battery is now low on ammo and will fire at half its effectiveness for the remainder of the game.  The two is reduced by two more for firing at the deployed guns.  No hits.  But the French skirmishers fire as well and get another hit on the battery.  Shots at the opposing Dutch/Belgian skirmisher all miss their mark.
The Dutch battery is hit by the skirmishers and so the die is changed from a one to a two.
The firing is now concluded.  There are no melees or morale checks, so the second turn is over.