Sunday, November 27, 2016

Liberty Or Death Project

It has been two months since my last post. The hiatus has been due to two reasons. First and foremost, the school year started again, and along with it high school football.  Both of those have been keeping me busy. But a second contributor was that I was waiting for my hobby/guest room to be completed. I went without a work space for several weeks. But football is over and the room is finished and I am back in action.

I used some of my commission money to purchase Warlord Games Liberty or Death boxed set.  It is crammed full with a lot of goodies and I have made some progress.  I am building units for Sharp Practice. I will have more than enough figures to build just about any unit I want. I have a little over 100 of the figures painted and based along with all of the terrain pieces it came with.

By way of commentary, I think the set is a great value.  If you are looking to get into the American Revolution, this is it. The terrain pieces are a nice plus.  I also picked up the 4Ground bridge when I ordered as the shipping was free and I figured I'd always need a bridge for a variety of scenarios.

My only complaint is that the figures are not the easiest to assemble. There are several minute parts that my stubby fingers had a very hard time getting together.  For some reason, they make the bicorned heads in two pieces. I confess that I uttered more than a few curse words under my breath trying to get them assembled. But overall, I am quite pleased with how things are turning out.

Here are some pictures of my progress so far:

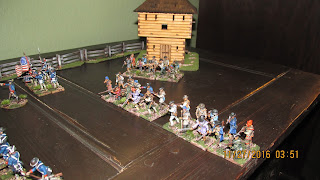
The 4Ground blockhouse was fairly easy to assemble. The only modifications I have made have been to ink the roof and add some features to the base.

Here are the British. You get a glimpse of the bridge and some of the fencing. I am particularly pleased with how the fences turned. I just added a little ballast and some flocking to the bases after using a four color process on the fences.

Two light company groups square off on the bridge.

These are the militia. I started with them and regret that now. I hadn't figured out quite how to put these figures together, so not all of the arms made it to the right figures.  But you can only tell if you look really closely. 


A nice shot of my Continentals along the fence.
Next up will be the Hessian contingent of two musketeer groups, one of grenadiers and six jagers.
I will also have three officers, but to fill out the other groups I'll have to try to convert a few of my British into musketeers.

Tuesday, September 6, 2016

Breaking the Silence

It has been awhile since I have posted.  I finished up a couple of large commissions and a personal project.  I am in the process of upgrading my hobby area, so I have been trying to get ready for the final phase.  However, that has meant no painting for the next month or so.  Candidly, the break will probably be a good one for me.  It will be good to recharge a bit and then start up again in a brand new environment.

Additionally, school has started back up again, along with my involvement with the local high school football team, so I am keeping busy doing some other productive things.  No complaints here.


Saturday, August 13, 2016

2nd Game of Sharp Practice II

As with any set of wargaming rules, there is a learning curve.  After my first game I realized I had done a couple of things wrong, so I had another go at it.  This time I made deployment points and used them.  The French had some extra points to supplement their force with, so they chose a scout which gave them a second deployment point to use.

British deployment point

French deployment point
The other thing I did was use the point system to make sure that each force was equal.  There were a total of 104 points on each side.  I added an artillery piece to the British side to give me some experience with how to handle guns.

Artillery tearing up a French formation.
In the picture above, I had hoped to charge the unsupported gun with the French formation on the hill, but the number of shock points they had accumulated meant that they needed to roll an 8 or higher to close.  I didn't have any command chips handy, so I chose not to risk it.  I fired a volley instead and took out a gunner and inflicted three shock points.

Another thing I am learning is that skirmishers and light infantry are quite vulnerable.  Initially, I was pleased that they could pop away and be a nuisance, but then the formation they were shooting at got to return fire and literally blew them apart.  I gave them the cover bonus for being skirmishers, but even so, they don't hold up well.  A light company was forced to retire.  I rolled a die and the British morale was lowered one point.  A French skirmish group had the same trouble against three groups of British infantry.

A group of the 95th
Rifles suffers 3 losses and several shock points as a result of a volley from a French formation of two groups.

The French dragoons cantered down the road into range of a group of 95th Rifles.  The Rifles got to take a shot and killed on trooper and inflicted some shock.  This was enough to cause the French horsemen to retire and await an opportunity to make an impact. On their left, a large formation of German infantry advanced to attack the village and its Spanish garrison.
Germans making their way toward to the village
On the British left, the artillery forced back a formation of two French groups while three groups of the 28th Foot pushed into a wood and drove back a group of skirmishers.
French infantry retires behind a hill to escape another blast of canister from the British gun.

The 28th Foot clears the wood of a pesky group of French skirmishers.
As play ended for the day the Anglo/Spanish force still had a firm hold of the town, but its light infantry contingent had been whittled down considerably.  Additionally, two formations of French and German infantry were drawing closer to contact.

I did a better job this game of remembering to roll to see if leaders were hit when casualties were inflicted on groups they were attached to.  I also had a better feel for how to use the command chips, though it will take some time to become proficient with them.

Here's a link to a Youtube video I put together:
Youtube link


Wednesday, August 10, 2016

1st Game of Sharp Practice II

Most of my hobby time has been devoted to doing commission work, but I have that finished now, so I had a chance to finally try my hand at Sharp Practice II.  I have made movement stands for my figures that include tags that give all the information for the individual group.  When I purchased the rules I also purchased the tokens, so I used those today.  It's a bit different than using cards, but I liked it..

In this encounter, I had seven leaders for each side as well as three command cards.  I tried to keep things simple so I could just get through as many turns as possible.  The French had the objective of taking a town from a combined force of British and Spanish.

This is the village.  It was also the deployment point for the British/Spanish forces.
The deployment point for the French was at the opposite end of the table.  As luck would have it, the British tokens came up much more frequently than the French.  But by using command tokens, the French were able to keep pace with the enemy.

The first conflict came between a British light company that occupied a small farm on a hill and an opposing German company of skirmishers.  Over the course of three turns the Germans came out a little bit ahead.

The Brits have lost a figure and received three shock points; the Germans have suffered only one shock point.
Along the road is where most of the action took place.  A voltiguer company boldly advanced and inflicted a casualty and some shock on three groups of Spanish in a line.  But on the next turn, the Spanish token was pulled first and the controlled first volley literally blew the French skirmishers away.  I need to look at the rules more closely to see if I missed some modifiers for shooting at skirmishers in the open.  My initial examination didn't find anything.

The next turn I used two command tokens to charge a troop of dragoons at the now unloaded Spanish companies.  The dragoons won the melee and drove back the Spaniards 9 inches.  But later in the turn, Captain Sharp's company of rifles was able to pour in a volley and take out another figure from the dragoons and add some more shock.


The victorious dragoons take additional casualties from Sharp's company of rifles.
 On the last turn of the game, two companies of the 28th Regiment of Foot fired a volley at long range against the oncoming 63rd Ligne.  22 dice ended up being rolled and 17 hits were inflicted.  When the smoke cleared, six of the French were out of the fight and three points of shock were added to the two French groups.

The 63rd receives a hot greeting from the British 28th Foot.
That's were I ended the game for the day.  The French clearly took a beating in these early turns, but the Spaniards were certainly shaken up by the French cavalry.  I will continue the battle tomorrow to see if the French can use their superior numbers to turn things around.  Stay tuned.

Friday, July 29, 2016

ECW Commission

I am on to my next commission.  This is in a period I have never done before, the English Civil War.  The figures are all from Warlord Games, mostly plastic, but several metal models added in.  This has been a fun challenge.  The uniforms are varied, so lots of different colors/highlights for each unit.  It takes more time, but isn't as boring as painting scores of soldiers in the same kit.  I have put a dent in the project by completing the Royalist infantry, three regiments of 26 figures each.  Here are a couple of photos.

This is Newcastle's Regiment in white coats.

This is Tiller's Regiment in green coats.
Today I am going to finish a cannon and crew, a few preachers, and get a start on 12 Royalist dragoons.  After that, it's on to the larger force of Scottish Convenaters.  I have much to do before I have to head back to school.

Friday, July 22, 2016

2nd Day of Gettysburg Wrap Up

We just finished our week of American Civil War action.  14 young people, with the help of three assistants, had a terrific week of gaming.  We ran the battle twice.  The second time through we added some reinforcements to add a little drama to the game, which worked out quite well.  Both sides had to decide where to commit their troops and how they would use them.  It was a nice addition.

The most encouraging aspect of doing this class is seeing just how much kids can enjoy this hobby.  They pick up the rules quickly and a couple have even started purchasing and painting their own figures.  By the way, they do a much better job at their tender age than I ever did.

Here are some pictures from our second game.  There were five points along the Emmitsburg Road that were the objectives.  There would not be a draw this game!  The brigades were distributed along both sides of the table in a much more even fashion, but it was clear that the Union line was spread thin with little reserves to plug any holes that might occur.  

This is the Union extreme left.  That is the 20th Maine in the foreground, commanded by our lone female participant.  As in history, this regiment proved to be a very touch nut to crack for the Rebs.
This is to the right of the previous picture.  This hill would become the dominant geographic feature at this end of the table.


Moving north along the Union line, this was the weakest part of the Yankee position.

Many charges and counter charges took place at this stretch of the road.

This is the Union right center.  Those two batteries proved to make the biggest difference on this end of the table.

This is the Union left center with the wheat field in the foreground.
After the first day of fighting the Confederates had the definite edge, making their superiority in numbers felt all along the line.  The only bright spot for the Yanks was that their artillery did a lot of damage to their counterparts in gray.  This would have a definite effect on the overall outcome.

These are pictures from the very end of the game.  The Union controlled three of the five objectives and contested a fourth, so it was a clear victory for the men in blue.  This was surprising, because the Confederates had such an advantage in numbers.  But they seemed determined to attack straight ahead, with no real regard for where the objectives were.  In the end, they smashed up against strong points that had no real significance at the expense of securing all important objectives.

On the Rebel left, Robertson's elite brigade was bested by incredibly accurate artillery fire from the hill on their right and some amazing dice rolls by the young Union player who opposed them.

The Rebels controlled this objective right up until the end of the game.  Instead of capturing it and then just holding on, the young rebs here were determined to press on their attack against superior numbers.  The net result was 66% casualties.

Much loss of life occurred here, at a strategically meaningless place on the table.

The Confederate center was battered relentlessly by superior Union artillery.

This is the peach orchard.  The Confederates captured this objective early and held it until the end.  However, they weren't able to use it to break through and exploit their success.

The Confederate position on Seminary ridge.

Despite being outnumbered, the battered Union regiments were able to hold their ground.  Some well timed rolls of 10 certainly helped with that.

The extreme Rebel right.  Despite having overwhelming numbers, they weren't able to drive the stubborn Yankees off the table.  One Confederate brigade that could have made a huge difference elsewhere on the table, never fired a shot.

Benning's Georgians trying to vanquish Vincent's brigade.  They were unsuccessful.


Here is a link to a video that will give you an idea of just how much the kids were enjoying this experience.

Monday, July 18, 2016

The Second Day at Gettysburg

Today was the first day of our wargame based on the second day at Gettysburg.  14 players, seven on each side, would be commanding literally hundreds of figures in our simulation.  I also had the good fortune of having three older students helping out which makes things so much better!  We are using Regimental Fire and Fury rules.  Things are fairly historically accurate in the center and Union right, but we had to take some liberties on the Union left due to the size of the table.

Looking North down the Emmitsburg Road

The Union players preparing to defend.

Hood's division ready to assault


Historically, the battle began with perhaps the fiercest exchange of artillery fire of the entire war.  That was not the case today.  The Confederates decided to charge straight away as they felt they had a huge numerical advantage.  On the rebel right, Law's brigade stepped off only to be greeted by a hail of fire from the Union line.  Five stands, representing 200 men historically, were knocked out of the line.  That was more than the rookie commander could endure, so he decided to pull back on the next turn.  On his right, our lone female player was a bit more cautious and had the only artillery battery on this end of the table at her disposal.  She was able to disorder two Union regiments at no cost to herself.

Law's losses, prompting a retrograde movement.

In the center, the Confederate batteries tore their Union counterparts apart, throwing nines and tens almost exclusively.  The consequence, however, was that several artillery caissons were quickly emptied and ammunition would be scarce for the remainder of the game.  On turn two, Barksdale's men would attempt to charge the peach orchard, only to be thrown back with heavy losses from blasts of canister from the remaining Union batteries.

McLaws' men before the attack

Barksdale attacking the peach orchard

The Union center
 
On the Rebel left, DH Hill's two small brigades attempted to close with the more numerous Yankees facing them and were decimated.

From DH Hill's position

Looking south down the Emmitsburg Road
DH HIll's Florida brigade taking losses in their ill fated attack
As the day came to a close, the young Confederate commanders came to appreciate how difficult it is to advance over open ground against a determined enemy.  Rebel casualty markers littered the field in solemn testimony to the hard lesson that was learned this day.


Wednesday, July 13, 2016

My Latest Commission is Finished!

It took fifteen days, but I was able to assemble, paint and base 265 figures.  I couldn't have done it if it hadn't been my summer break.  I enjoyed the project.  I did the hardest units first, the Victrix boxes of 60 figures each, while I was still fresh.

Here's a link to a video of the completed soldiers.

https://youtu.be/PXd5ZAfZ9u4


Tuesday, July 12, 2016

Day 2 of SYW Campaign

My young pupils arrived eager to renew the battle they had begun yesterday.  Each side was allowed to select a certain number of points in reinforcements.  The place and time of their arrival, however, was determined by dice rolls.  Coincidentally, all of the Prussians arrived on their right flank despite only having a one in six chance of doing so.  This brought that end of the table to life in an instant.  By the end of the day's action, a Prussian cavalry brigade had forced two Russian infantry brigades into square and destroyed a battery.  But one of their regiments suffered 75% casualties in the effort and a Russian light cavalry brigade has fortuitously arrived in time to probably drive off the Prussian horsemen.  But a brigade of Prussian grenadiers has maneuvered into a position to be able to attack the second most important objective that is held by a single Russian battalion.

Prussian cavalry attack on the right flank

Prussian grenadiers prepare to attack an important objective
In the middle, the Prussians sent over a lone brigade to take on three Russian ones.  The Prussians were forced to take a brigade morale test due to the number of losses they suffered, and they failed. so back across the bridge they went.  A second Prussian brigade arrived and took up a defensive position on the other's left flank.  This sector settled into a firefight.  Prussian jagers were able to inflict 75% casualties on a Russian heavy battery, but other than that, this sector was a stalemate.  In the grand scheme of things, however. two Prussian brigades have been able to tie down four Russian ones.  This could have a major impact on the outcome

Prussian attack on the middle is blunted

The action is now primarily a firefight.
On the Prussian left, the cavalry melee continued to see saw back and forth.  The Russian fought desperately.  At the day's end, though, one brigade was completely wiped out and the other was close to the end.  The Prussian cavalry on this flank has suffered close to 33% casualties.

The meat grinder that is the Prussian left flank.

The numbers are considerably lighter at the end of the day.