Saturday, November 7, 2015

More Victrix British

It has been a long time since my last post.  My hard drive crashed and I have slowly but surely been trying to get back up to speed.  I am glad to be able to update my blog and get back into the swing of things.

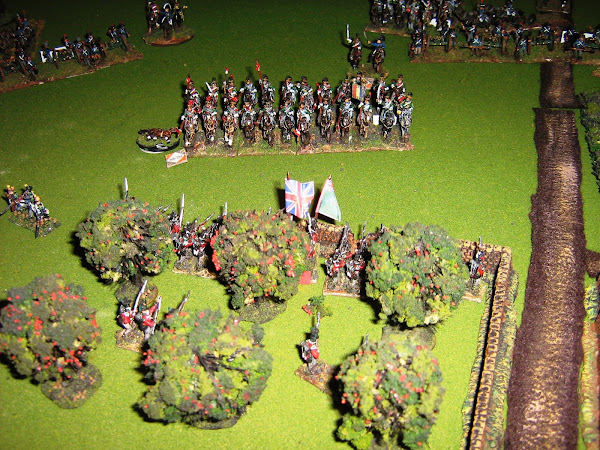
My latest completed project was three regiments of Victrix Waterloo Brits.  Each unit is made up of six stands with six figures.  I printed the flags in black and white and then hand painted them.  I like the look of them.

All three regiments

A closer look

A regiment in square

Sunday, September 20, 2015

Perry Dragoons, box 2

Two weeks ago I picked up a second box of Perry dragoons.  This is a great kit full of nice models.  You get 13 mounted, 8 dismounted PLUS six casualty figures.  They assemble easily and the quality of the figures make them a joy to paint.  I just have to base the dismounted dragoons and then I'll be finished with the project.  My 28mm collection is becoming quite formidable.  I think I have over 500 figures, including cavalry, infantry and artillery.  They are solely for viewing pleasure at this point, but one day soon I hope to get them on a table and see what it is like playing a game with them.
Dragoon officer

casualty stand

base of troopers

trumpeter. very handsome figure

The whole unit plus three of the casualty stands.
another casualty stand

the elite dragoon

the standard bearer

Wednesday, September 2, 2015

Warlord Games Napoleonic Portugese

I purchased a couple of boxes of Warlord Games Portugese to give myself a project to paint.  The models were easy to assemble and the detail was good.  All of the line companies are in marching poses, but there is a nice variety to give the 24 man unit a nice appearance on the table.  They painted up easily.  Here is the first regiment that I completed this week, the 18th Regiment.  I should finish the 12th Regiment over the Labor Day Weekend.
Each box comes with equipment for four grenadiers.

The command figures are all made of metal.

All in all, a nice addition to my Peninsular collection.

Sunday, August 23, 2015

Spanish Battle Part 2

I concluded my Spanish battle today in an attempt to better understand the General de Brigade rules.  The focus today was on the Support Order.  In yesterday's account, a Spanish infantry brigade was driven back 30 centimeters as a result of failing a brigade morale test.  They fled through a supporting cavalry brigade which caused the three regiments to become unformed.
On the next turn, the French advanced to take the hill.  They fired on the regrouping cavalry, but did no damage.

On the next turn, the Spaniards were allowed to make one charge on a formed infantry unit.  The lancers were selected to strike.  Their target was the unit on the left of the picture above.  Having already fired, the battalion suffered a -2 plus and additional -2 for charging cavalry.  No horsemen were lost in the assault.  They passed their moral check, as did the French, but being conscripts, they lost the melee and had to retreat.
The Spanish lancer close, but ultimately lose the melee.
On the next two turns an additional cavalry unit charges.  In each case, the unit sustains casualties and is unable to close.
Spanish dragoons attempt to charge.

An overview of the overall situation.
Despite the failure of the charges, they do buy time for the infantry to regroup and advance back into the battle for the ridge line.
The Spanish infantry attempt to retake their former position on the ridge.
The Spanish artillery once again comes into play and does fearful execution among the blue clad columns.  But three French columns assault the Spanish right against two Spanish units in line.  One is forced to retreat, the other is routed.  This, for all intents and purposes, ends the battle in favor of the French.  It has been a very costly victory indeed.
The defeated Spanish units can be seen at the top of the picture.

The star for the Spanish side was this battery of artillery.  But it wasn't enough to win the day.
I learned a lot more about the General de Brigade rules through this little action.  There are little things that can make big differences.  For instance, the Spanish lancers gained a +1 to their moral roll for not having any casualties.  This was just enough to allow them to close.  It didn't help them in the melee, however.  It was a fun game.  I hope you enjoyed the account.

Saturday, August 22, 2015

Spanish Battle and new Terrain pieces

This last week I was working on some new terrain pieces for my table.  The first project was some scratch built river sections using simple cardboard and quick drying spackling.  I was pleased with the result.  Second, I picked up a cheap doormat at Lowes and turned it into some new fields.  Again, I think they turned out well.
New fields and river sections

Close up of the river sections

The new fields up close
I continue to try to master the General de Brigade rules.  I set up a small encounter between a large Franco/Swiss brigade and a Spanish rearguard supported by cavalry trying to hold a hill. 
A French horse battery supports the attack

Three French battalions prepare to assault the waiting Spaniards.

The Spanish position is formidable.
Being on assault orders, the French must be aggressive.  An attack goes in on the left flank against a large conscript unit.  The French take enough casualties in the approach to cause them to falter.  The first attack is unsuccessful.
The casualty markers testify to the losses sustained in the first attempt to attack the Spanish right flank.
A similar result occurs on the opposite flank.
The attack on the right also is halted.
But the French stand fast against the Spanish resistance and work a battalion onto their right flank in preparation for another attack.  The conscript fires a pathetic volley at the unit attacking their front, causing no damage.  Both attacking units pass their morale tests.  It is now time for the conscripts to test.  Being conscript and being attacked on their flank makes their chances of standing slight.  A roll of 3 only makes matters worse.  They rout from the field.  This forces two other units within 15 centimeters to test their moral as well.  Both are forced to retreat.  This, in turn, forces the entire brigade to test morale.  With over 25% of its units routing or retreating and its overall status being conscript/2nd line, it isn't looking good.  The dice are rolled and the net result is a five.  The entire brigade is forced to withdraw 30 centimeters.  This clears the ridge and the French, despite significant casualties, take the hill.  The supporting Spanish cavalry are unformed by the retreating infantry and are unable to counter attack.  The French have won a glorious victory, but at a high price.
The French center fills the space vacated by the fleeing Spanish battery.

The Swiss take the ground that had been defended well earlier.

The victory on the French left started the dominoes falling in their favor.
The victory, as sweet as it was, had a high price.
The three French casualty stands testify to the stoic efforts of the Spanish artillery battery.  But they were eventually swept away by the flight of the rest of the brigade.

After thoughts: I am liking the mechanics of the General de Brigade rules more and more.  In this case, the inferior Spanish units were able to hold up pretty well for the first two turns.  But their fragile nature was revealed once they suffered a setback.  I think this captured the essence of what battle was like on the Peninsula.  Next time, I want to have a combined Spanish and English force take on the blue columns of Napoleon and see how that goes.

Saturday, August 15, 2015

Brock's Field AAR

I had a great time today with three of my most accomplished student.  The four of us gathered together at 9:00 for a Regimental Fire and Fury game based on the Battle of Chickamauga.  Two Confederate divisions squared off against two Union ones.  Brian and I commanded the rebels; James and Chris the Yankees.

I had envisioned the Union side to fight a more defensive battle, but was pleasantly surprised to see them aggressively move out on their left flank to attack.  This was quite historical actually, and made our game very interesting.  I commanded the Confederate left and moved out just as aggressively, hoping to turn the Union flank before they could send reinforcements from their left.
Turn 1: Cheatham's division moves out.

Turn 1: Willich's Yanks attack the rebel right

Turn 2: The Confederate brigades move rather quickly through the thick forests to get at the Union right.

Turn 2:  The Union also strikes down the Brotherton Road.
By turn three the battle was in full swing.  Due to the thick forests, artillery was extremely limited and the effects of musketry were reduced.  Nevertheless, casualties began to mount on both sides across the table.

Turn 3: first shots fired.

Turn 4: Willich makes gains on the left

Turn 4: This became the "bloody angle" of our battle.  Many Yankees fell here.

Turn 4: Action in the center

Turn 4: Cheatham is ready to attack

Turn 4: The rebs counter-attack.
On turn five Cheatham unleashed his assault on Grose's over-stretched brigade.  Grose's men gave ground grudgingly.  This would not be the lightening victory the Confederate generals had anticipated.

Turn 5: Cheatham's brigades scramble through the rough terrain and pile in against a stubborn defense.

Turn 5: The Yankees give ground, but despite being heavily outnumbered, manage to keep the gray flood at bay.

Turn 5: Hazen's men fight heroically to hold the critical high ground in the center.
By turn seven the Union commanders were able to shift a brigade from their left to their right.  But would it be enough and in time to save the day?

Turn 7: Reinforcements arrive.
One of the fun things about RFF is when a "0", or 10, is rolled on the 10 sided die.  This forces a check to see if any general within 4" becomes a casualty.  A second toss of 1-7 isn't a real problem as it translates into a minor wound at worst.  On an 8, 9, or 10 however, the commander is lost for the game.  On turn 8 the Confederates lost Brigadier General P. Smith to a mortal wound.  On turn 9, General Grose was felled by a bullet as well.  This came at the very worst time as his brigade was already at a breaking point.
Turn 9: Cheatham secures the hill.

Turn 9: The Union attack down the Brotherton Road is stalled.

Turn 9: The fighting in the center has been particularly desperate.
We called the game after turn 11.  The Union right had been smashed.  Gains had been made in the attack on the rebel right, but any support for Willich had been diverted to the other end of the battlefield and Strahl's fresh brigade of Confederate infantry was making its way to drive him back.  In terms of casualties, two Union men fell for every Confederate.

This was a very fun battle with some terrific young men.  Their grasp of the rules made the time very enjoyable for all of us.  I look forward to future engagements with this up and coming gamers.