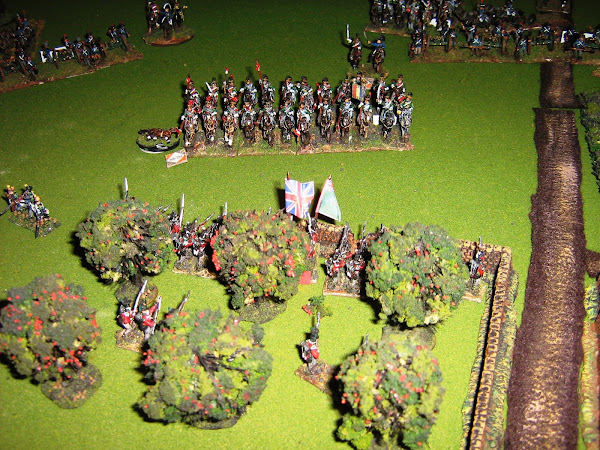

I picked up The Battle of Qutre Bras by Mike Robinson. It is a very detailed account of the battle I have been interested for many years. It takes a long time to get rolling as the beginning sets the scene and goes to great lengths (too much in my opinion) to get the individual regiments to the battlefield.
Once the two sides engage, the author does a good job of picturing the action. There are maps which are very helpful in getting a clear idea of what happened and where. But only the allies are depicted in detail. The French are very obscure which was a huge disappointment to me. Also, for a work as specific as this one, I couldn't understand why there wasn't a detailed order of battle in the appendixes. It certainly wouldn't have been hard to find one to include.
Despite that, the book has been a worthwhile purchase. I'll be doing a Napoleonic week for my summer class, and my reading will help me put together some good scenarios for the kids. The first one, I am sure, will center around the Dutch/Belgians attempt to hold their ground despite being heavily outnumbered and several of their units being raw militia. They did an extraordinary job under the circumstances.
The second will follow the exploits of Picton's division as they enter the battle on the allied left. The British batallions were quite aggressive and paid a high price for it, first from French canister and then from cavalry which they mistook to be Dutch/Belgian.
I have the week off and I am hoping to finish the book during my break. Perhaps I'll even be able to set something up on my wargaming table!
Sunday, March 28, 2010


Monday, December 21, 2009
ACW Wargame account
This is a fictional battle that takes place in May of 1863 in Northen Virginia. Ruttledge Gap is a sleepy railroad junction that is a vital link in Lee's supply line. A large Union force of four divisions has been ordered to take town and destroy the tracks. Stonewall Jackson, with three divisions, has been ordered to protect the town and so force marches his men to get there in time .
.
Entry points and times or arrival were determined by dice rolls. Stonewall's division under D.H. Hill is the first to arrive, which is very fortunate for the South. Hill has five brigades to put into play, and he'll need every man as two Union divisions are entering the field within a half hour.
The p icture to the left is at the end of turn three. Colquitt's brigade has taken position at a crossroads on a hill just west of the town. He has just beat Wilcox's Union division to it. But no sooner has he deployed than D.H. Hill sees a strong Union column approaching from the north, threatening his righ flank. To meet this threat, the Confederat general orders G.B. Anderson's men to form a line to the northeast of Colquitt. At the same time another rebel brigade marches through the town toward the north and then moves west along a farm road to add even more weight to the right flank.
 This picture is taken at the end of turn four and shows Crook's brigade coming onto the table and moving towards Colquitt's flank.
 .
.Entry points and times or arrival were determined by dice rolls. Stonewall's division under D.H. Hill is the first to arrive, which is very fortunate for the South. Hill has five brigades to put into play, and he'll need every man as two Union divisions are entering the field within a half hour.
The p
 icture to the left is at the end of turn three. Colquitt's brigade has taken position at a crossroads on a hill just west of the town. He has just beat Wilcox's Union division to it. But no sooner has he deployed than D.H. Hill sees a strong Union column approaching from the north, threatening his righ flank. To meet this threat, the Confederat general orders G.B. Anderson's men to form a line to the northeast of Colquitt. At the same time another rebel brigade marches through the town toward the north and then moves west along a farm road to add even more weight to the right flank.
 This picture is taken at the end of turn four and shows Crook's brigade coming onto the table and moving towards Colquitt's flank.
This final photo is of the first Union casualty to be suffered from the ranks of the 2/46th New York.
The Hardaway Alabama artillery found the range and drew first blood. The men in blue passed the moral check and continued to join the remainder of the brigade in attacking the crossroads. D.H. Hill will have all he can handle to hold off this attack as Union reinforcements can be seen marching towards the ford to the west and there has been no word of any Confederates approaching to support him.

The Hardaway Alabama artillery found the range and drew first blood. The men in blue passed the moral check and continued to join the remainder of the brigade in attacking the crossroads. D.H. Hill will have all he can handle to hold off this attack as Union reinforcements can be seen marching towards the ford to the west and there has been no word of any Confederates approaching to support him.
Saturday, November 21, 2009
latest figures
 This is my latest unit to be added to my Napoleonic French collection. These are 15mm Old Glory figures in two battalions. I still have to add the flag to the Eagle. I also painted up a battery of Old Guard 12lb guns and a brigade commander. While small in numbers, I am sure they will carry their weight on the gaming table.
Just click the image to see a larger version.
Wednesday, November 11, 2009
 On this very important day of remembrance I wanted to pay tribute to the many in my family who have served in our armed forces and risked everything to protect our way of life. My great uncle died in World War I in a valient effort to reach the "lost battalion." My paternal grandfather was at Pearl Harbor on December 7, 1941, aboard the USS Utah. My maternal grandfather served in the airborne during WWII and received the Purple Heart three times. What a legacy they are to me.
Thank you to all who are currently serving our country. I am in your debt.
Sunday, October 25, 2009
Blog update
I can't believe that over a month has gone by since my last post. School started up again and so my time has been limited. But I have still managed to paint some figures, mostly SYW infantry. I treated myself to some Old Glory 15mm French Napoleonic grenadiers for my birthday. I got them primed and put on popsicle sticks. I am going to do two battalions of 36 figures each. I think I am going to include a mounted officer on each command stand, so that may mean just 35 figures per battalion. To accompany these elite units I will add an Old Guard foot battery of four 12lb guns. They should be a formidable force.
I am itching to put together a game. I just need to set a date and send out an email and see what happens. Time goes by so quickly.
I'll post some pictures when I finish the grenadiers.
I am itching to put together a game. I just need to set a date and send out an email and see what happens. Time goes by so quickly.
I'll post some pictures when I finish the grenadiers.
Thursday, August 27, 2009
GdB battle report
This fictional battle pitted the Prince of Orange, commanding a division of Dutch/Belgians, against Marshal Ney, overseeing two infantry divisions and a light cavalry division. The Prince is expecting a British Division to reinforce him, but is unsure of when it will arrive. Ney's mission is to drive off the Dutch/Belgians and hold on to the road junction until the rest of the French army can come up in support.
The Marshal was very aggressive and ordered all three of his divisions to assault. The dense columns advanced toward the enemy in a grand display. However, in the very first turn, the Dutch foot battery rolled a double six when firing at a French battery, destroying a secion and faltering it. But elsewhere, the French moved resolutely on toward their objectives.
 The Dutch Jagers put up a stiff fight on the Allied right flank, driving off the French skirmishers ordered to drive them out. But in the next turn, two columns of French legere took on the task. But the Jagers gave up ground only grudginly.
 On the French left flank, the commander decided to try to soften up the Nassau battalion holding the farm with artillyer before sending in his infantry. This would also allow the cavarlry to get rid of the Belgian dragoons to his division's right flank. He did, however, send in two battalions to clear the wood of skirmishers on his left.
 The picture below shows the French lancers just prior to their charge against the Belgian dragoons. Remarkably, the dragoons withstood the first assault and were only pushed back, but with very heavy loss. The following turn this brave regiment was all but destroyed. That lancers' losses were light.
 On turn three, the French attacked with vigor, and the Dutch/Belgians responded with elan. The picture below shows the heavy casualties sustained by the3/1st legere as it is slammed with cannister and musketry. It passed its moral test, but was in desperate need of support.
 On turn four, the two battalions of the 93rd ligne charged the 2nd Nassau battalion. The Nassauers were able to falter both battalions with a stinging volley. To the Nassauers' left, a Dutch horse battery was routed by two battalions of the 4th legere. On the French left, a Belgian line regiment was driven back into the village by an attack of the 2/1st legere. The Prince is nervously looking over his shoulder, but sees no evidence of help being on its way.
The Marshal was very aggressive and ordered all three of his divisions to assault. The dense columns advanced toward the enemy in a grand display. However, in the very first turn, the Dutch foot battery rolled a double six when firing at a French battery, destroying a secion and faltering it. But elsewhere, the French moved resolutely on toward their objectives.
 The Dutch Jagers put up a stiff fight on the Allied right flank, driving off the French skirmishers ordered to drive them out. But in the next turn, two columns of French legere took on the task. But the Jagers gave up ground only grudginly. On the French left flank, the commander decided to try to soften up the Nassau battalion holding the farm with artillyer before sending in his infantry. This would also allow the cavarlry to get rid of the Belgian dragoons to his division's right flank. He did, however, send in two battalions to clear the wood of skirmishers on his left.
 The picture below shows the French lancers just prior to their charge against the Belgian dragoons. Remarkably, the dragoons withstood the first assault and were only pushed back, but with very heavy loss. The following turn this brave regiment was all but destroyed. That lancers' losses were light.
 On turn three, the French attacked with vigor, and the Dutch/Belgians responded with elan. The picture below shows the heavy casualties sustained by the3/1st legere as it is slammed with cannister and musketry. It passed its moral test, but was in desperate need of support.
 On turn four, the two battalions of the 93rd ligne charged the 2nd Nassau battalion. The Nassauers were able to falter both battalions with a stinging volley. To the Nassauers' left, a Dutch horse battery was routed by two battalions of the 4th legere. On the French left, a Belgian line regiment was driven back into the village by an attack of the 2/1st legere. The Prince is nervously looking over his shoulder, but sees no evidence of help being on its way.
Sunday, August 16, 2009
General de Brigade
I finished my miniatures class toward the end of July and then began a class to add a certificate to my teaching credential. That limited my wargaming activities somewhat. But the class has ended and I still have a couple of weeks of summer left, so I dusted off my Napoleonic collection for a small battle.
The practice with Die Kriesgkunst made this easier than previous games. The scenario had a French divison, supported by a brigade of dragoons, attacking an Anglo-Hanoverian division trying to defend a town. The Hanoverian regulars were on the allied left and the British troops were on the right. Four batallions of Hanoverian landwehr were in a second line as a reserve.
The French attacked right away. The first action was between the two skirmish screens. The French definitely got the better of their adversaries. Following the skirmishers came the blue-clad columns. They were successful in each instance, driving back the allied line. On the extreme left, the dragoons forced an English regiment into square which was subsequently blasted by a battery of horse artillery.
After about six turns it was apparent that the French had been successful in driving off the Anglo-Hanoverian division. The French columns, with their plus two bonus for being in column was just enough of a benefit to win three out of four meles. I was again surprised to see how ineffective the artillery was unless it was firing canister. And then it was devestating, knocking out at least four or five figures at a time!
I have a much better feel for the rules, and so I was able to move at a more rapid pace, which made the game much more enjoyable.
This week I want to finish painting up about 250 ACW figures to either sell or use to replace older figures in my collection. It's nice to have a little time before school starts up again.
The practice with Die Kriesgkunst made this easier than previous games. The scenario had a French divison, supported by a brigade of dragoons, attacking an Anglo-Hanoverian division trying to defend a town. The Hanoverian regulars were on the allied left and the British troops were on the right. Four batallions of Hanoverian landwehr were in a second line as a reserve.
The French attacked right away. The first action was between the two skirmish screens. The French definitely got the better of their adversaries. Following the skirmishers came the blue-clad columns. They were successful in each instance, driving back the allied line. On the extreme left, the dragoons forced an English regiment into square which was subsequently blasted by a battery of horse artillery.
After about six turns it was apparent that the French had been successful in driving off the Anglo-Hanoverian division. The French columns, with their plus two bonus for being in column was just enough of a benefit to win three out of four meles. I was again surprised to see how ineffective the artillery was unless it was firing canister. And then it was devestating, knocking out at least four or five figures at a time!
I have a much better feel for the rules, and so I was able to move at a more rapid pace, which made the game much more enjoyable.
This week I want to finish painting up about 250 ACW figures to either sell or use to replace older figures in my collection. It's nice to have a little time before school starts up again.
Subscribe to:
Posts (Atom)