Monday, July 5, 2010

Camp VIP begins

Today I began my eighth year of sharing my hobby with an excited group of young people. 11 of the 14 who signed up were present for a week of wargaming the American Revolution since our nation's birthday was yesterday. I tried something different this time around, two tables as opposed to one big one. The shot on the right is of the first table. It features a town that needed to be held by the Americans. Their reinforcements would be arriving via table 2, which is to the right of this picture.


This is picture of table 2. The British would be allowed to place four brigades on the two tables as they chose after the Americans placed two brigades into the town. Reinforcements would arrive in a predetermined manner which the players were not aware of. After a brief overview of the rules and a discussion of the objectives the game was set in motion. We got through 8 turns in the first day, as there was a lot of maneuvering that took place. But tomorrow things should heat up considerably. It appears the Americans are off to a good start as the Brits were distracted by a rather brash advance by American dragoons. However, it's very early in the contest.

Here is a picture of some of the kids moving their troops in the early portion of the game. The more experienced players were very good about helping out the less experienced ones. And as is often the case, the youngest players have turned out to be the most enthusiastic. As the session ended they were already plotting their strategy for the next day!


Thursday, June 24, 2010

I am getting ready for my summer class. The first week will center around the American Revolution. In this little practice battle, an elite force of British and Hessians are trying to push back a division of Americans. This picture shows the starting position of the two sides.


The Brits and Hessians advanced and took an opening volley from the colonists. They sustained casualties, but didn't flinch at all.


On the next turn, the Hessians also engaged with the same basic result. But the Guards managed to rout an American unit, leaving a gaping hole in their line!


The First British Guards lowered their bayonettes and charged home, driving back the extreme left American regiment. But the unit that routed the previous turn rallied (double sixes) and so there is hope that the flank can hold.


On the American right, muskets continue to blaze away, but neither side is willing to give any ground.


Sunday, May 16, 2010

Summer class filled!

The director of the summer camp I teach at just let me know that all three sections filled up almost immediately. Apparently the class has developed quite a following. Unfortunately, some of the kids from previous years won't be able to attend unless I allow more students per class, but that diminishes the experience for everyone, so I am extremely hesitant to consider that. However, it's encouraging to know that there are a lot of potential wargamers out there!

Monday, May 3, 2010

Gemioncourt continued


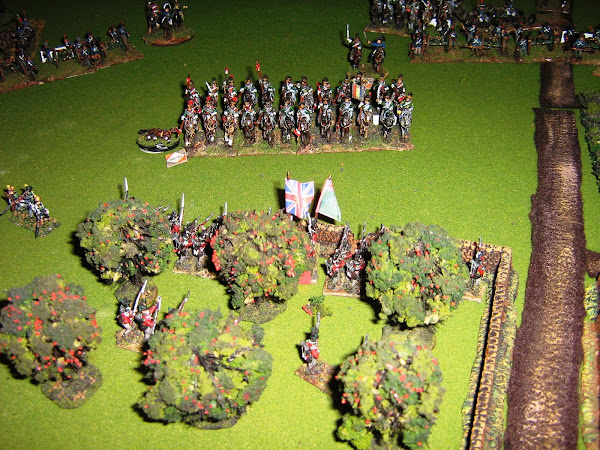
The battle has continued on, with the French proving to be very successful in their efforts. A British brigade entered the fray on the allied left, which initially seemed that it would dramatically turn the tide. However, a brigade of French lancers also arrived at the same time and more than checked this advantage. In the shot below (click on the image to enlarge) the lancers have crushed a square and are now poised to destroy a battery of foot artillery. To the French left of the above action, a combination of infantry and cannister has driven off the Orange Nassau battalion with heavy losses, uncovering the other flank of the British brigade. Still another column of French infantry has successfully stormed the Gemioncourt farm complex, driving off the Dutch militia that occupied it.
And finally, after sustaining heavy losses, the French were able to drive off a Dutch foot battery, uncovering a line of Belgian infantry. A battery of French heavy guns has made short work of them. Unless additional forces arrive soon, the situation will be irretrievable for the allies.


Sunday, April 4, 2010

Fight for Gemioncourt

With the information from Mike Robinson's book in hand, plus

some detailed maps from some other websites, I am able to reconstruct some pretty accurate wargame situations. This is the opening stages of the battle as the French try to take the strongpoint of Gemioncourt, held by the first brigade of the 2nd Netherlands Division. (click the pictures to enlarge.)

The French attempted to bombard the allied position with two batteries, but at long range weren't able to do much damage. It was therefore decided to advance the guns. This proved costly as the Netherland artillery inflicted three casualties on the limbered guns. The advance can be seen in the photo below.

On the French right, things start off well as the swarm of skirmishers was able to drive back the 27th Jagers on the first turn. On turn two, however, a second attempt was met with a devestating volley, including a double six. This caused five casualties to the screen and drove

them back 20 centimeters! The risk to officer roll was a three, which meant the brigadier's horse bolted and ran into the enemy lines leading to his capture. This brought the brigade's advance to an abrupt halt until an aide de camp could be detached to straighten the situation out.

The shot below is of the farm of Gemioncourt which is held by a battalion of militia


This is a shot of the last line of defense, a battalion of the Orange Nassau Regiment, under the watchful eye of the Prince of Orange himself.


Sunday, March 28, 2010

The Battle of Quatre Bras

I picked up The Battle of Qutre Bras by Mike Robinson. It is a very detailed account of the battle I have been interested for many years. It takes a long time to get rolling as the beginning sets the scene and goes to great lengths (too much in my opinion) to get the individual regiments to the battlefield.

Once the two sides engage, the author does a good job of picturing the action. There are maps which are very helpful in getting a clear idea of what happened and where. But only the allies are depicted in detail. The French are very obscure which was a huge disappointment to me. Also, for a work as specific as this one, I couldn't understand why there wasn't a detailed order of battle in the appendixes. It certainly wouldn't have been hard to find one to include.

Despite that, the book has been a worthwhile purchase. I'll be doing a Napoleonic week for my summer class, and my reading will help me put together some good scenarios for the kids. The first one, I am sure, will center around the Dutch/Belgians attempt to hold their ground despite being heavily outnumbered and several of their units being raw militia. They did an extraordinary job under the circumstances.

The second will follow the exploits of Picton's division as they enter the battle on the allied left. The British batallions were quite aggressive and paid a high price for it, first from French canister and then from cavalry which they mistook to be Dutch/Belgian.

I have the week off and I am hoping to finish the book during my break. Perhaps I'll even be able to set something up on my wargaming table!
Monday, December 21, 2009

ACW Wargame account

This is a fictional battle that takes place in May of 1863 in Northen Virginia. Ruttledge Gap is a sleepy railroad junction that is a vital link in Lee's supply line. A large Union force of four divisions has been ordered to take town and destroy the tracks. Stonewall Jackson, with three divisions, has been ordered to protect the town and so force marches his men to get there in time.
Entry points and times or arrival were determined by dice rolls. Stonewall's division under D.H. Hill is the first to arrive, which is very fortunate for the South. Hill has five brigades to put into play, and he'll need every man as two Union divisions are entering the field within a half hour.


The picture to the left is at the end of turn three. Colquitt's brigade has taken position at a crossroads on a hill just west of the town. He has just beat Wilcox's Union division to it. But no sooner has he deployed than D.H. Hill sees a strong Union column approaching from the north, threatening his righ flank. To meet this threat, the Confederat general orders G.B. Anderson's men to form a line to the northeast of Colquitt. At the same time another rebel brigade marches through the town toward the north and then moves west along a farm road to add even more weight to the right flank.


This picture is taken at the end of turn four and shows Crook's brigade coming onto the table and moving towards Colquitt's flank.

This final photo is of the first Union casualty to be suffered from the ranks of the 2/46th New York.
The Hardaway Alabama artillery found the range and drew first blood. The men in blue passed the moral check and continued to join the remainder of the brigade in attacking the crossroads. D.H. Hill will have all he can handle to hold off this attack as Union reinforcements can be seen marching towards the ford to the west and there has been no word of any Confederates approaching to support him.