Monday, March 7, 2016

Sharpe's Practice Game

The Bridges at Torres Antigua

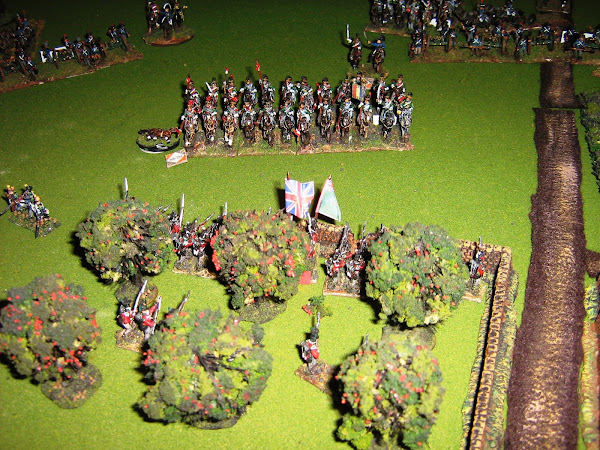
            This fictional battle was set up for Sharpe’s Practice.  Four French players squared off against four British.  The scenario called for the British force to hold and/or destroy the vital bridges at Torres Antigua.  Captain Sharpe, two companies of highlanders and a cannon were already in the town to contest the advance of two full French battalions, a squadron of cavalry and two cannon.

A company of highlanders at the east bridge

A second company of highlanders in reserve in the town
  British reinforcements were on their way, including a second section of the Royal Foot artillery, a squadron of light dragoons, and, most importantly, a wagon load of gun powder for the demolition of one of the bridges.

Some of the British reinforcements

The French attacking from the north

Looking north.

Looking south

            It took a couple of turns for the French to deploy for the attack from two sides.  The companies of the legere battalion attacked from the north while the 63rd Ligne attacked from the east.  The cavalry assisted the legere companies.

The French traffic jam

The artillery duel

            In the first real exchange of musketry Sergeant Harper was critically wounded and lost for the duration of the game.  This meant that Captain Sharpe would be stretched thin in trying to lend his three leadership points to his two sections of riflemen.
            The British reinforcements were coming from the south.  In a bold move, the British players decided to send their cavalry across a ford and attack the French from the other side of the river.  This caused a degree of concern for the commander of the 63rd Ligne.  He attempted to bring two companies under the command of one of his big men so that they could fire as a line.  He also deployed his cannon to take on the threat of the British horse.
            To the north, a traffic jam prevented the French from making much progress.  The British gun fired on the crowded columns, but didn’t have much affect.  Then the French gun came into play, taking a position on a hill opposite their British counterparts.  The French fire was much more effective and killed half of the royal gunners.
            Time was winding down and so both sides feverishly attempted to push troops into the fray.  One troop of French dragoons got stuck on the northern bridge and was forced to withdraw with staggering casualties.  The second troop attempted to charge across the structure to seize the southern edge of the bridge.  Their momentum carried them into the reserve company of ill prepared highlanders.  The odds were squarely against them (36 dice against 12).  When the final toll was assessed, however, the kilted infantry had won the melee by a single casualty.  The stunned horsemen were forced to fall back and regroup.
            In the meantime, to the east, luck was with the French.  Their card was drawn first and they were able to unleash a thunderous volley into the column of light dragoons at close range.  Seven of the ten dashing cavalrymen fell from their saddles.  Their bold attempt had failed, but it was not in vain.

The light dragoons take a beating

            As the French had to take on the light dragoons, the cart with the gun powder plodded along the road and made its way onto the bridge.  As the game came to an end, the table shook from the blast of the explosive barrels.

The French secure the northern bridge, but in the background the wagon with the gun powder can be seen just before the explosion.

            The game was declared a draw.  The French had secured both ends of the northern bridge while the eastern bridge was destroyed.  Both sides’ cavalry had paid the steepest part of the butcher’s bill with little to show for it.

            It took awhile for things to get going in our game, but once they did it got pretty exciting.  It was the first time playing the game for most of the players, but they picked it up quickly and things moved along at a good pace.

Thursday, February 11, 2016

Quatre Bras 3:00-3:30

  I played out two more turns on the original table set up.  The French have been able to drive back the allied skirmish screen and secure the ridge overlooking Gemioncourt, making it untenable for continued defense.  Foy's division has been able to get a foothold in the Bossu would and Pire's light cavalry have advanced within charge range of the Dutch/Belgian infantry.  Things have become desperate for Perponcher.  But just as hope seems to be lost, two regiments of Dutch/Belgian cavalry arrive as does the vanguard of Picton's division.  So it is time to shift the battle to the next table setup.


Bachlu's division takes the ridge.  Pire's cavalry are in the foreground.
Gauthier's men drive back the 2nd Nassau

Pire's cavalry advance to attack towards Quatre Bras.
The 27th Jagers have put up a stubborn defense, but are finally driven back by superior numbers.

The 5th Dutch Militia and the 7th Belgian Infantry Regiment form a line to cover the retreat of the garrison of Gemincourt and to buy time for the allied cavalry to deploy.
Over the weekend I will shift the battle northwards and things will get busy very quickly as reinforcements are arriving for both sides.  What has been largely a skirmish and artillery duel will develop into a full scale battle in the next couple of turns.

This will serve as the map for the next phase of my battle.  My table gives me just enough room to recreate the heart of the battle.  So far, the simulation has followed history to almost a tee. 

Monday, February 8, 2016

Quatre Bras 2-3 o'clock

Ney's legions stepped off to the attack this afternoon in this recreation of the battle.  Cannons blazed across the placid fields, tearing the mid afternoon calmness to shreds.  Bijveld's battery bravely held the ridge south of Gemioncourt for as long as possible, but not without the loss of a gun.  It's shot and cannister knocked 60 men out of the 2/4th Leger's ranks.  The 27th Dutch Jagers also put up a stiff fight, even after the artillery withdrew.  Despite being considerably outnumbered, the riflemen dropped several of the French skirmishers and even managed to lightly wound General de Brigade Campi.

Stevenaar's battery added to the cacophony of sound to cover the retreat of Bijveld's guns.  On the French left, Gauthier's men engaged a battalion of the 2nd Nassau that was sheltered in the Bossu Wood.  On the other end of the field, two battalions of the 2nd Legere occupied Peraumont.  Ney's assault, despite being tardy, is off to a good start.

Here is how things looked at the end of four turns, of one hour of historical time.

The 2nd Legere prepare to occupy Peraumont

Campi's men tangling with the 27th Jagers.

Gauthier's brigade about to enter the Bossu Wood

French horse artillery supporting Bachelu's Division

Jamin's Brigade driving off the allied artillery.

An overview of the battlefield looking east from the Bossu Wood.
The garrison of Gemioncourt await their fate as the battle boils over the ridge towards them.

Stevenaar's Battery in action

Sunday, February 7, 2016

Quatre Bras Historical Wargame

For Christmas my daughter got me Prelude to Waterloo: Quatre Bras by Andrew Field.  This book features the French perspective of the battle and has an excellent series of maps.  As I have the entire order of battle for both sides in this encounter at a 1:20 ratio, I thought I would try to recreate it through a series of scenarios.  My only real limitation was the size of my table, so portions of the battle may have to be broken down into two different scenarios from the same hour fought separately.

This is the full map from the book
This is the portion of the map that fits on my table.
The battle begins at 2:00.  The late start will have a very negative effect on the outcome for the French.  To start, a thinly deployed Dutch/Belgian division of fairly low grade troops will do its best to buy time for Wellington's redcoats to arrive.  Ney's first objective is to push up the road and secure a ridge that shelters the farm of Gemioncourt.  His advance is shielded by an immense swarm of skirmishers.  His artillery greatly outnumbers the allied guns.  Here is what the table looks like as the battle is about to begin.

Bachelu's Division with the targeted ridge in the background

Bachelu's artillery.
Bijveld's lone battery and the 27th Jagers will delay the French hoards for as long as possible.
Ney's secondary objective is to cut the road towards Ligny.  To that end, he wants to secure the village of Peraumont.  He sends a brigade of lancers and a large regiment of light infantry to accomplish this task.  They find the village empty.

The outskirts of Peraumont at the extreme edge of my table.

Wathier's lancers on their way to the objective.
Here are some of the other units that will be a part of the initial advance.

Two battalions of the 2nd Nassau deployed int the Bossu Wood

Campi's Brigade of Bachelu's Division

Gauthier's Brigade of Foy's division on the French left

Hubert's chasseurs on the extreme left flank

Jamin's Brigade of Foy's division ready to attack straight up the road towards Quatre Bras.
It's 2:00.  The battle is read to begin.

Wednesday, January 27, 2016

My Latest Napoleonics

I bought myself a Christmas present through Warlord Games: a box of late Victrix French infantry and then some officers, casualty figures and a small group of engineers made by Warlord Games.  Here are some of the pictures.
Warlord Games French engineers

Warlord Games British officers (figure on the left painted as a Portugese colonel)

Warlord Games French officers (grenadier head taken from the Victrix infantry box)

Victrix grenadier company

Victrix infantry command stand with Warlord mounted colonel.

Victrix voltiguers

Victrix line company
The whole battalion

Warlord Games French casualty stands
My collection of these 28mm plastic figures has grown to be formidable and includes infantry, cavalry and artillery.  I want to get a box of the new Victrix French artillery and add another box of Victrix British artillery.  Perhaps one day I'll actually put them on the table and have the two forces slug it out.

Friday, January 22, 2016

Middle School Gaming Event

Today I was able to host my first event for our Military History in Miniature Club.  12 students participated, along with two alumni who ventured over from the high school.  The majority of the club wanted to play Flames of War.  This game was entirely student led and had 10 of the 12 members participate.  I added a small game of Sharpe's Practice that attracted the other two students and we had a great game as well.  I was able to use my Napoleonic figures for this go.

In the Flames of War game, it looked like the Germans got the better of the Americans based on the number of flaming hulks I saw towards the end of the day.  I was involved in my Shape's Practice game and wasn't able to pay much attention, but everyone seemed to be having a very good time.  The two student leaders did a good job of keeping things moving.

The German armor at the start of the game.

The American armor.
Turn One: The Germans advance.

Here they are using the wood to cover their attack.
Turn 3: German armor getting the upper hand.

The Germans secure the farmhouse on their side of the table.
The end of the game.
In the Sharpe's Practice game, the French outnumbered the British significantly, but the redcoats had the advantage of solid cover.  The French player moved out boldly, his cards coming up all at once.  The British player elected not to garrison the buildings in the town in the first turn and this would come back to haunt him later.  The French units closed quickly and, due to the way the cards fell, got most of the first shots.  The French player rolled well and the British casualties began to mount.  The 1/63rd's 1st company charged a portion of Sharpe's riflemen defending a wall and killed them to the man, including the gallant Captain Sharpe.  The voltiger company was able to occupy three of the town's buildings that same turn and that was the beginning of the end.  Some British reinforcements arrived, but were too late to alter the situation.  This was clearly a French victory.

The beginning of the game.
The French right.
The defense of the town.
A section of the Royal Foot Artillery coming up to add to the town's defense.
The French player moves up his artillery.
The French close in for the attack and overwhelm the outnumbered riflemen.
It was a very good start to our wargaming year.  It's a good group of kids and a few of them are investing in figures of their own.  That's a big step forward towards raising up the next generation of gamers.

Sunday, January 3, 2016

2016 Preview

For Christmas my oldest daughter gave me Prelude to Waterloo by Andrew Field.  This gives a French perspective to the battle of Quatre Bras.  It has some excellent maps and it has inspired me to take on the project of developing scenarios for the various phases of the battles.  I have the complete order of battle for each side, and now I know where and when the French forces joined the battle.

As for my painting table, I believe the second half of a commission I started last December will be coming my way.  In addition to that, I took advantage of Warlord Games' after Christmas sale to pick up some mounted officers and French infantry which should be arriving in the next week or so.  Between these two projects, I should be keeping busy for a little while.  I'll post pictures as they become available.