
I can't believe that over a month has gone by since my last post. School started up again and so my time has been limited. But I have still managed to paint some figures, mostly SYW infantry. I treated myself to some Old Glory 15mm French Napoleonic grenadiers for my birthday. I got them primed and put on popsicle sticks. I am going to do two battalions of 36 figures each. I think I am going to include a mounted officer on each command stand, so that may mean just 35 figures per battalion. To accompany these elite units I will add an Old Guard foot battery of four 12lb guns. They should be a formidable force.
I am itching to put together a game. I just need to set a date and send out an email and see what happens. Time goes by so quickly.
I'll post some pictures when I finish the grenadiers.
Sunday, October 25, 2009


Thursday, August 27, 2009
GdB battle report
This fictional battle pitted the Prince of Orange, commanding a division of Dutch/Belgians, against Marshal Ney, overseeing two infantry divisions and a light cavalry division. The Prince is expecting a British Division to reinforce him, but is unsure of when it will arrive. Ney's mission is to drive off the Dutch/Belgians and hold on to the road junction until the rest of the French army can come up in support.
The Marshal was very aggressive and ordered all three of his divisions to assault. The dense columns advanced toward the enemy in a grand display. However, in the very first turn, the Dutch foot battery rolled a double six when firing at a French battery, destroying a secion and faltering it. But elsewhere, the French moved resolutely on toward their objectives.
 The Dutch Jagers put up a stiff fight on the Allied right flank, driving off the French skirmishers ordered to drive them out. But in the next turn, two columns of French legere took on the task. But the Jagers gave up ground only grudginly.
 On the French left flank, the commander decided to try to soften up the Nassau battalion holding the farm with artillyer before sending in his infantry. This would also allow the cavarlry to get rid of the Belgian dragoons to his division's right flank. He did, however, send in two battalions to clear the wood of skirmishers on his left.
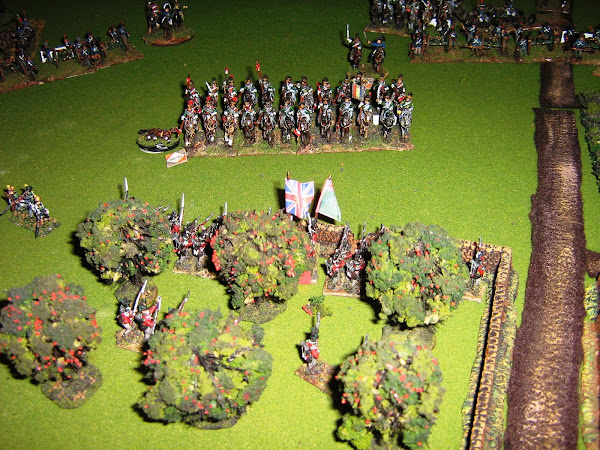
 The picture below shows the French lancers just prior to their charge against the Belgian dragoons. Remarkably, the dragoons withstood the first assault and were only pushed back, but with very heavy loss. The following turn this brave regiment was all but destroyed. That lancers' losses were light.
 On turn three, the French attacked with vigor, and the Dutch/Belgians responded with elan. The picture below shows the heavy casualties sustained by the3/1st legere as it is slammed with cannister and musketry. It passed its moral test, but was in desperate need of support.
 On turn four, the two battalions of the 93rd ligne charged the 2nd Nassau battalion. The Nassauers were able to falter both battalions with a stinging volley. To the Nassauers' left, a Dutch horse battery was routed by two battalions of the 4th legere. On the French left, a Belgian line regiment was driven back into the village by an attack of the 2/1st legere. The Prince is nervously looking over his shoulder, but sees no evidence of help being on its way.
The Marshal was very aggressive and ordered all three of his divisions to assault. The dense columns advanced toward the enemy in a grand display. However, in the very first turn, the Dutch foot battery rolled a double six when firing at a French battery, destroying a secion and faltering it. But elsewhere, the French moved resolutely on toward their objectives.
 The Dutch Jagers put up a stiff fight on the Allied right flank, driving off the French skirmishers ordered to drive them out. But in the next turn, two columns of French legere took on the task. But the Jagers gave up ground only grudginly. On the French left flank, the commander decided to try to soften up the Nassau battalion holding the farm with artillyer before sending in his infantry. This would also allow the cavarlry to get rid of the Belgian dragoons to his division's right flank. He did, however, send in two battalions to clear the wood of skirmishers on his left.
 The picture below shows the French lancers just prior to their charge against the Belgian dragoons. Remarkably, the dragoons withstood the first assault and were only pushed back, but with very heavy loss. The following turn this brave regiment was all but destroyed. That lancers' losses were light.
 On turn three, the French attacked with vigor, and the Dutch/Belgians responded with elan. The picture below shows the heavy casualties sustained by the3/1st legere as it is slammed with cannister and musketry. It passed its moral test, but was in desperate need of support.
 On turn four, the two battalions of the 93rd ligne charged the 2nd Nassau battalion. The Nassauers were able to falter both battalions with a stinging volley. To the Nassauers' left, a Dutch horse battery was routed by two battalions of the 4th legere. On the French left, a Belgian line regiment was driven back into the village by an attack of the 2/1st legere. The Prince is nervously looking over his shoulder, but sees no evidence of help being on its way.
Sunday, August 16, 2009
General de Brigade
I finished my miniatures class toward the end of July and then began a class to add a certificate to my teaching credential. That limited my wargaming activities somewhat. But the class has ended and I still have a couple of weeks of summer left, so I dusted off my Napoleonic collection for a small battle.
The practice with Die Kriesgkunst made this easier than previous games. The scenario had a French divison, supported by a brigade of dragoons, attacking an Anglo-Hanoverian division trying to defend a town. The Hanoverian regulars were on the allied left and the British troops were on the right. Four batallions of Hanoverian landwehr were in a second line as a reserve.
The French attacked right away. The first action was between the two skirmish screens. The French definitely got the better of their adversaries. Following the skirmishers came the blue-clad columns. They were successful in each instance, driving back the allied line. On the extreme left, the dragoons forced an English regiment into square which was subsequently blasted by a battery of horse artillery.
After about six turns it was apparent that the French had been successful in driving off the Anglo-Hanoverian division. The French columns, with their plus two bonus for being in column was just enough of a benefit to win three out of four meles. I was again surprised to see how ineffective the artillery was unless it was firing canister. And then it was devestating, knocking out at least four or five figures at a time!
I have a much better feel for the rules, and so I was able to move at a more rapid pace, which made the game much more enjoyable.
This week I want to finish painting up about 250 ACW figures to either sell or use to replace older figures in my collection. It's nice to have a little time before school starts up again.
Thursday, July 23, 2009
Camp VIP days three and four
Days three and four have seen a lot of action in our re-fight of Antietam. The battle has spread the length of the table, evolving into three hotly contested actions. The longest running is pictured here in the cornfield. Despite a continual stream of fresh brigades entering the fray, the Union hasn't been able to gain the advantage here. But the rebel ranks are getting very thin, so tomorrow's action could see a yankee breakthrough. In this shot, three of the six Confederate generals can be seen plotting their next move.
 The second portion of the battle has centered around the attack on the sunken road. Despite heavy losses, the bluebellies just keep on coming, and their volleys have left gaping holes in the rebel line. But help is on the way for the final day of the game.
 Finally, day three saw a Union corp sneak across the Antietam on the extreme right flank of the enemy. However, the men in gray have ground down the yankee legions. But the greatest hope of victory for the Union is with the men picture below, making their way through a wood to the flank of the defending rebels.

 In this shot, three of the six Confederate generals can be seen plotting their next move.
 The second portion of the battle has centered around the attack on the sunken road. Despite heavy losses, the bluebellies just keep on coming, and their volleys have left gaping holes in the rebel line. But help is on the way for the final day of the game.
 Finally, day three saw a Union corp sneak across the Antietam on the extreme right flank of the enemy. However, the men in gray have ground down the yankee legions. But the greatest hope of victory for the Union is with the men picture below, making their way through a wood to the flank of the defending rebels.

Tuesday, July 21, 2009
Camp VIP week three
The third and final week of camp VIP is underway. This week we are recreating the bloody battle of Antietam. There are six players to a side with the ages ranging from 9 to 14. We are sticking loosely to the timetable of troops entering into the field, but liberties have been taken. After all, all of the commanders need troops! The shot below (click to enlarge) is the beginning of the first turn. A lot of action has taken place on this end of the table. By turn 6, French's very inexperienced unit appeared and had difficulty deploying its first brigade into line. By turn 8, he was ready to try his first attack on the formidable sunken road position.
 The fighting in the cornfield was very fierce. Union general Hartsuff got too close to the enemy and was shot dead out of his saddle. For the moment, the Confederates are holding firm, but there seems to be an unending supply of troops in blue entering the field with each turn.
 To make things a little more interesting as we head into the third day, a division of Union troops, Wilcox's to be exact, have managed to find a crossing of the Antietam beyond the right flank of the Rebs. This end of the table had been pretty quiet except for some artillery duels. That is certain to change as the player arrive for day three.

 By turn 6, French's very inexperienced unit appeared and had difficulty deploying its first brigade into line. By turn 8, he was ready to try his first attack on the formidable sunken road position.
 The fighting in the cornfield was very fierce. Union general Hartsuff got too close to the enemy and was shot dead out of his saddle. For the moment, the Confederates are holding firm, but there seems to be an unending supply of troops in blue entering the field with each turn.
 To make things a little more interesting as we head into the third day, a division of Union troops, Wilcox's to be exact, have managed to find a crossing of the Antietam beyond the right flank of the Rebs. This end of the table had been pretty quiet except for some artillery duels. That is certain to change as the player arrive for day three.

Saturday, July 18, 2009
Week two of Camp VIP is complete
We wrapped up week two of Camp VIP with a colonial game using the Battles For Empire rules. A relief column, pictured below, was supposed to march across 10 feet of table to get to a besieged outpost. The natvie players arrived at different locations at different times. But one group arrived early enough and near enough to pin down the entire relief column long enough that they didn't have a chance of reaching the other end of the table by game's end. The kids enjoyed the rules as they are simpler than the ones we used for the American Revolution.
 All in all, it was a good week.

 The kids enjoyed the rules as they are simpler than the ones we used for the American Revolution.
 All in all, it was a good week.

Friday, July 17, 2009
Americans win battle of Brandywine Creek!
After almost four days of gaming action, the Americans were able to claim a dearly won victory against the British. Despite heavy losses, they were able to hold their line, though if the battle had gone on much longer it is probable that the American left would have given way. The shot below is of the plowed hill where the Americans, particularly the lowly militia, stubbornly held on, and even managed to work two brigades into the rear of the British formations. This is a shot of the American left. A fresh brigade of Hessians can be seen in the right center of the picture.
 The participants were terrific. They all seemed to enjoy the game and were great sports.
 Today we wrap up the week with a colonial game pitting British redcoats agains masses of Ansars and Fuzzie Wuzzies. I'll post some pictures over the weekend.
 This is a shot of the American left. A fresh brigade of Hessians can be seen in the right center of the picture.
 The participants were terrific. They all seemed to enjoy the game and were great sports.
 Today we wrap up the week with a colonial game pitting British redcoats agains masses of Ansars and Fuzzie Wuzzies. I'll post some pictures over the weekend.
Subscribe to:
Posts (Atom)