Wednesday, February 21, 2018

Sharp Practice Peninsula Battle

I had the good fortune of hosting a game of Sharp Practice for five students this week. Our last engagement was with 28mm AWI figures. For this go around we took out my 15mm Napoleonic collection. However, we kept the ranges the same as for 28mm.

This is the table. The French DP is at the bottom of the screen, the British at the upper right.

The British Army

The French Army
The mission was for the French to get a supply train across the length of the table. The Brits job was to prevent this. The French started with 11 morale points, the British just 9. This two point differential would have a profound impact on the game.

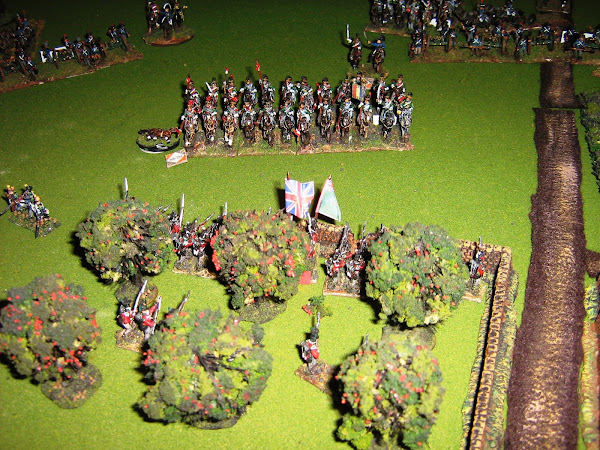
The British players aggressively moved toward the French DP and the town situated on the cross roads. The French had a hard time unclogging the congestion around their deployment point, but were able to get their two troops of dragoons down the road and within striking distance of the town.

A group of British grenadiers impetuously tried to get into the town ahead of the arrival of the dragoons. They fell an inch short and had to take on the mounted French in fisticuffs. The red coats lost the combat, but not as badly as one would have thought.

This game we did a better job of keeping track of "Bad Things that Happened" which impacts army morale. As a result of their forced withdrawal, the British lost a point on the morale table.

Each side thrust more units toward the town and crossroads. The cavalry of both sides were caught in the open and riddled by controlled volleys of musketry. Leaders were lost and morale points continued to decrease.

A major error of judgement occurred when the French player mistakenly thought that the chip for his supply train had not yet been drawn. He had four command chips at his disposal, but failed to use them before the Tiffin chip came up. His three wagons and group of grenadiers sat idle as a formation of three British units charged home. The French grenadiers were driven off and the wagons seized; a disaster for French arms!

Both sides attempt to secure the key crossroads and town. A German unit has taken up a position in front of the town. The all important supply train is trying to make its way past the town ahead of the advancing British and Spanish.


 All would have ended well for the British if the Tiffin chip had come up, but fate played a cruel trick on the celebrating allies. The token representing the German formation appeared, allowing the green clad infantrymen to advance and fire upon the remnants of the British grenadier company. It was a lethal volley that forced two "Bad Things that Happen" rolls. The net result was that the British morale fell to zero, ending the game.
This is the end of the game. The three German groups can be seen surrounding the space that had previously held the now destroyed British grenadiers.

It was a good game, and our understanding of the rules improved greatly. One particularly interesting event was a shot from a British artillery piece at the French gun resulted in five kills! It was a remarkable event. It was decided that the accompanying caisson had been hit and the explosion wiped out the entire crew.


Sunday, February 4, 2018

Latest Punic War Addtions

I couldn't resist the new elephant set Victrix put out recently. It was relatively easy to assemble. If you are thinking about making the purchase, I would say also getting the decal set from Little Big Man Studios is a must. You can tell from the photos below just how much they add to the model. I applied them to the tower prior to attaching it to the body of the elephant. This made things much easier. The set was about $11, but I think it was well worth it. They are perfectly designed for this particular set. I purchased the Carthaginian set, but there are sets for Numidians and Romans as well. The accompanying infantry figures can be assembled to represent any of those three nationalities.


Along with the elephants, I picked up a box of Rome's Italian Allied Legions along with two sheets of decals for them from LBMS. There were sixty figures. I used just 43 to make up my legion.  I thought it would be Republican Romans just packaged differently, but this was not the case. The velities and the command figures are the same as in the Republican pack, but the heavy infantry figures are in different armor. The head options are different as well. It was a good purchase.


My next installment will come about when the Victrix Gauls are released, which should be very soon. I am also thinking of adding some Greeks, as they were involved in some of the battles that took place in Sicily. Realistically, though, I am just looking for more figures to paint!


Saturday, January 20, 2018

Sharp Practice 2 AWI Game

I got together today with three enthusiastic teen gamers to play a game of Sharp Practice 2. A British force was given the task of attacking an American strong point and to create as much havoc as possible. I had played some solo games, but this was the first time of actually having a live opponent.
The American Force


The British Force


The table from the British deployment point

Overview of the table
Both sides chose to supplement their forces with a secondary deployment point.  This proved to be a greater advantage for the lobster backs. On the first turn, the Americans aggressively ran up one of their formations of state line troops to the middle of the table. This proved to be a mistake as later in the turn the British chip came up for three groups of British regulars to come on within close range of the Americans. They presented arms and let loose a controlled volley that reduced the line troops to a shambles.  They were pretty much out of the game from that point.

However, two turns later the continental formation arrived, moved and presented. Tensions rose as both sides desperately wanted to be able to fire first. The rebel commanders rejoiced as their chip was drawn. A murderous controlled volley tore through the British regulars. Making matters worse, the British commander was killed outright and his second in command was wounded, leaving the King's most powerful force adrift for the next few turns.
The British regulars are stopped cold by the Continentals
As well as things were going in the center for the Americans, the flanks were a different matter all together. On the British right, a tribe of Indian allies dashed through the wheat field and made it to the farm house in short order. On the next turn, flames consumed the building causing great consternation amongst the Americans. On the left,  British skirmishers and two groups of regulars got into position to attack the block house.

The Americans scramble to turn around some of their units to confront these threats, but the crowded conditions made maneuver very difficult. Adding to the confusion, the Indian tribe successfully set fire to the church and then sprinted to attack the rebel left flank. The fighting was hand to hand. The warriors drove back the state troops, but their exaltation was short lived as the American commander was able to play four game cards to allow one of his units a second turn. The disorganized braves were forced to make a hasty retreat and that was the end of the battle for them. Their attack, however, prevented the Americans to get any aid to the beleaguered defenders of the block house. As the game drew to a close, flames appeared upon the roof of the strategic structure. The skirmish unit inside scramble through the door to escape, only to be greeted by a volley from a group of British light infantry.
The Indians have set the farm on fire.
Smoke can be seen rising from the block house, signaling the ultimate defeat of the Americans.

Even though we had to consult the rules on several occasions, the game moved along pretty quickly. The guys really enjoyed the feel of the contest. Meaningful lessons were learned on both sides; another encounter will occur in the not too distant future.

Wednesday, January 3, 2018

Happy New Year! 2018's First Painted Unit

It is a new year and I have already been able to paint up a couple of units for my Napoleonic collection. The first to share is an 18 figure regiment of French cuirassiers. These are Perry plastics. I love the Perry plastic cavalry sets. They are easy to assemble and a joy to paint. There is so much detail. On these figures I used four different shades of blue for the tunics. It makes a significant difference in the quality of the finished product.


I am just about finished with a box of 36 Warlord games French light infantry. I just need to do a little highlighting and base them. I will post pictures when they are completed.

Friday, December 8, 2017

SYW Game for Middle Schoolers

It had been over a year since I had hosted a game for the students at my school. It has been hard to get motivated the older I get. But I ran into a former student who volunteered to help out, and so we set up a date. 18 students showed up to participate; four of them were young ladies.  We only had about two hours to play, but I was able to get it mostly set up before they arrived. It took about 20 minutes to get organized, then we launched the game. Remarkably, we were able to get through five turns in about an hour and a half of real time. By the end of turn five, it was pretty clear that the Prussians had gained a significant advantage on both flanks and achieved limited success in the middle. Therefore, they were declared the winners. And just like any wargame I have participated in, that result was hotly contested as the students drifted off into the night.


Getting ready to start

Overview of the table; Prussians on the left, Austrians and Reichsarmee on the right

Teams have been chosen

And we are off!

Two young ladies garrisoned the town and were stubborn in their defense of it.

Despite warnings from the more experienced gamers in the group, the outnumbered Swiss brigade attacks a superior Prussian force!

The Prussians attack

The Austrians move to meet them.

The Austrian cavalry commander, the most experienced player present, faced two novice female players on the extreme flank. The two cavalry forces smashed into each other. The girls rolled an eleven and were able to add plus one. The Austrian commander rolled a three. His units were routed. The Austrian flank was laid bare.

The routed Austrian cavalry. Quite humbling for the experienced Austrian commander. The girls were giddy at their success.

A final shot. The Prussians, despite heavy casualties in closing in, rolled well enough to pass all of their morale checks and then proceeded to win all of their melees. It was rather remarkable.
My former student was a tremendous help. The kids all seemed to have a blast, even though we had so many turn out.  As I write this account, I am exhausted, but in the best possible way. I shared my hobby with eager recipients. Each one inquired when the next battle would be. I am not sure, but I know I will have a lot of takers.


Sunday, December 3, 2017

Impetus on Youtube

I have posted a couple of videos on YouTube of my Impetus armies.
Impetus Video #1
Impetus Video #2

The armies arrayed for action

Thursday, November 30, 2017

Republican Roman Cavalry

This is the last of the Victrix figures I had on hand, some Republican Roman cavalry. It is actually the Greek cavalry set, but I saw that others had, with some light modifications, used it for Romans. I thought they turned out quite well. Now the Carthaginians will have some mounted troops to oppose them.

All three units, based for Impetus

Command